Creating Search Indexes
The search functionality will not work until the search indexes are created. These take a long time to create and also take a lot of disk space (which is why I don't include them in the Docker image). See below for how to create the indexes.
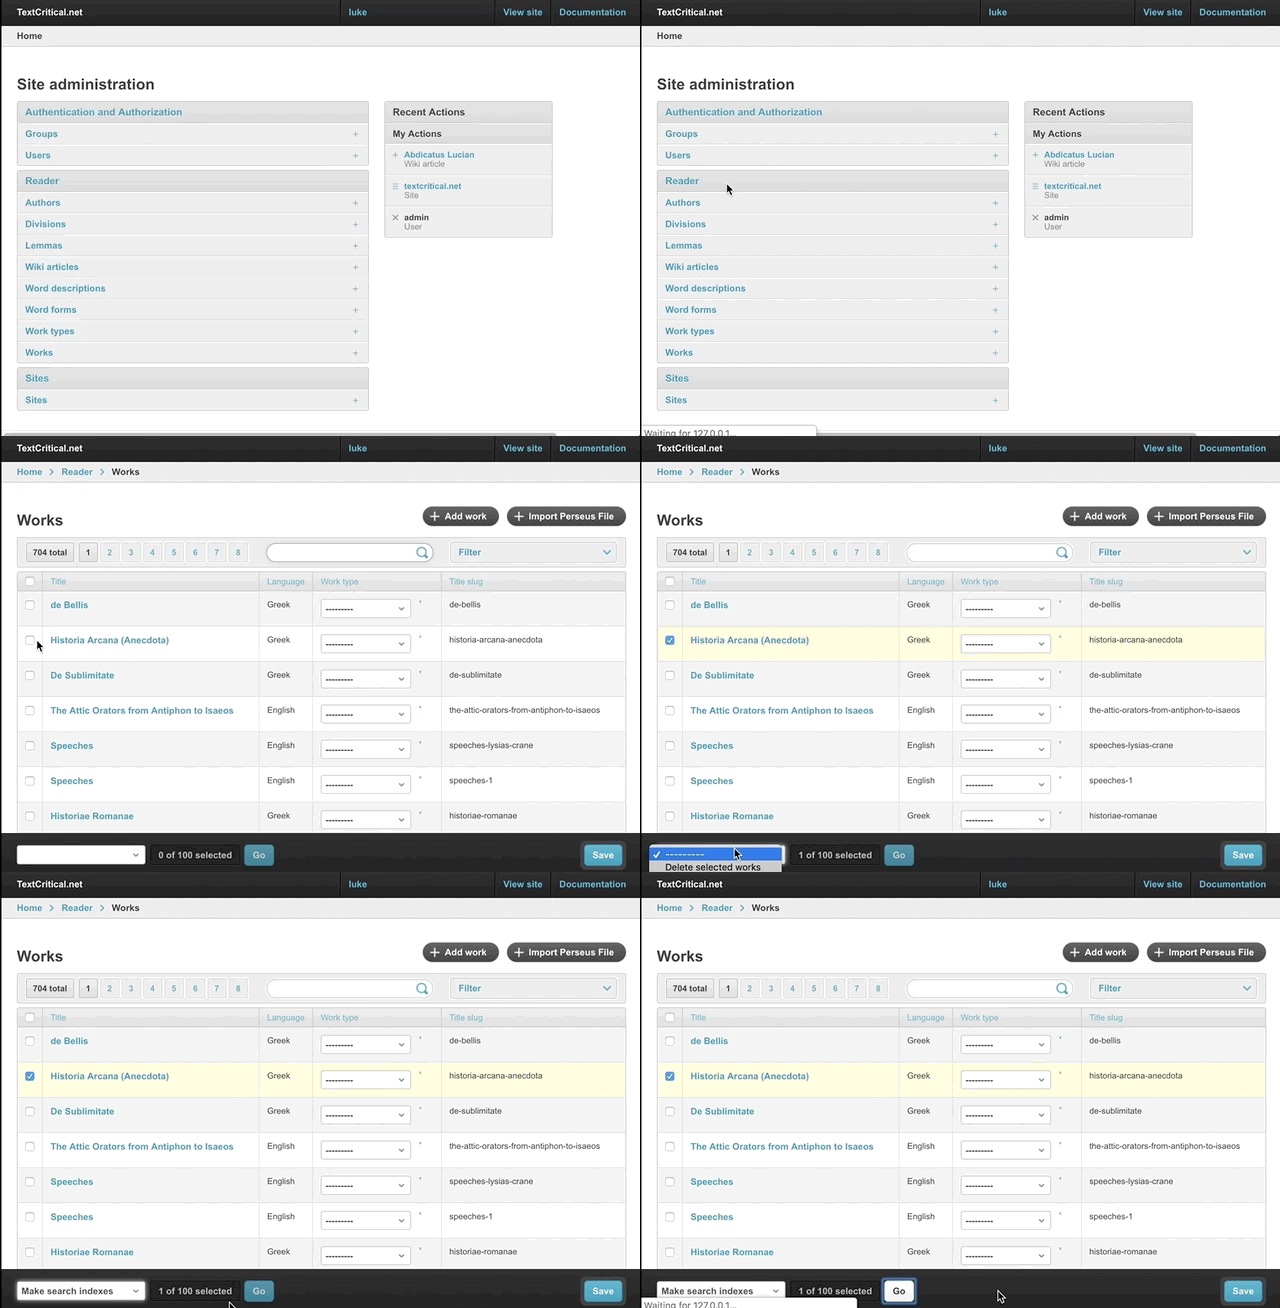
Creating them in the UI (for each work)
- Start by logging into the administration UI (i.e. http://127.0.0.1:8080/admin/). The username and password for the Docker image is admin/changeme.
- Select "Works"
- Select the work you want to create the search indexes for
- Click the action dropdown at the bottom of the page and select "Make search indexes"
The process make take a while, especially for large works.

Creating them from the command-line (and for all works)
You can also create the search indexes from the command-line. You can do this to create indexes for all works. This will take a great deal of time (like all night).
To do this, go to where the code for the project is stored and run the make_search_indexes command:
python manage.py make_search_indexes -c
Copying existing indexes
You can copy in an existing set of indexes into an instance by placing the indexes directory into the app's var directory.
Precreated indexes are available here: https://www.dropbox.com/s/ypko9y5c3r9bi63/indexes.tar.gz?dl=0
For a Docker image, you can use the "cp" command to send the
1. Start the docker image and get the container ID
Start the docker image with the following command:
docker run --rm -d -p 8080:8080/tcp textcritical:latest
This command will output a long string which is the container ID; something like "b2749ed9678ec7b7de018ce6e2af56345fda626d7759c889d0bf8ba1ec91cc4b". You will need for the next step.
If the image is already running, then run the following to get the ID:
docker ps
This will output something like the following; in this case the ID is "b2749ed9678e":
CONTAINER ID        IMAGE                            COMMAND                  CREATED             STATUS              PORTS                    NAMES
b2749ed9678e        textcritical:latest              "/usr/src/app/run_se…"   7 minutes ago       Up 7 minutes        0.0.0.0:8080->8080/tcp   dazzling_thompson
2. Copy in the indexes directory
Run the "docker cp" command from the same directory where you extracted the indexes directory. Below is an example for a docker image with an ID of "b2749ed9678e" (substitute this for the ID you got from the previous step):
docker cp indexes b2749ed9678e:/usr/src/app/var/indexes
3. Verify the indexes exist
You can verify the indexes exist by running a shell against the host like this:
docker exec -it b2749ed9678ec7b7de018ce6e2af56345fda626d7759c889d0bf8ba1ec91cc4b /bin/sh -c "[ -e /bin/bash ] && /bin/bash || /bin/sh"
Then run the following command:
ls /usr/src/app/var/indexes
This ought to output something like:
MAIN_WRITELOCK MAIN_pu71dfydzgq68p18.seg _MAIN_3.toc
Creating indexes in Docker
You can create the indexes in Docker by doing the following (assuming your container is named pedantic_goldberg):
screen -S reindex
docker exec -it pedantic_goldberg python manage.py make_search_indexes -c
Type Ctrl-a + Ctrl-d to detach from the session. You can list out the sessions with this:
screen -ls